Easy catsup – good enough for a Chicago hot dog!

catsup collageCatsup on a Chicago hot dog!!  Heresy you say?  Possibly, but home-made catsup is simple to make and allows you to control sweetness and tang.  Fast ’cause you’re just assembling and dumping ingredients into a slow cooker; cooker will work all day or overnight, but you’re not the one doing the cooking!  Let’s start:

catsup ingredients

You will need:

Slow cooker.  While you could make this on the stove, why???  sheesh!

Crushed tomatoes.  Two 28 oz cans, but use what you have and adjust seasonings.

Sugar.  ½ cup and can add more at the end.

Vinegar.  ½ cup white vinegar; you can swap out malt, apple cider or balsamic vinegar for variety.  White vinegar is what you find in the big brands.

Celery.  1 cup chopped ribs and leaves.  Many recipes use celery salt, but why not use the real thing?  Same goes for onion powder.

Onions.  2 small yellow onions because they were potent.

Garlic powder.  ½ teaspoon, but can add more at the end.

Clove for the tang.  Used 2 but they were leftovers from the Baby Jesus baby shower – use 1 if from this century.

Salt and pepper.  Couple of turns on the black pepper mill and a ½ teaspoon of sea salt; better to adjust at the end.

Immersion blender, processor or blender plus funnel & strainer.

garlic powder to catsup

I’ve added liquids and sugar plus two sliced yellow onions already – now comes garlic powder, salt, pepper and clove.  adding celery to catsup

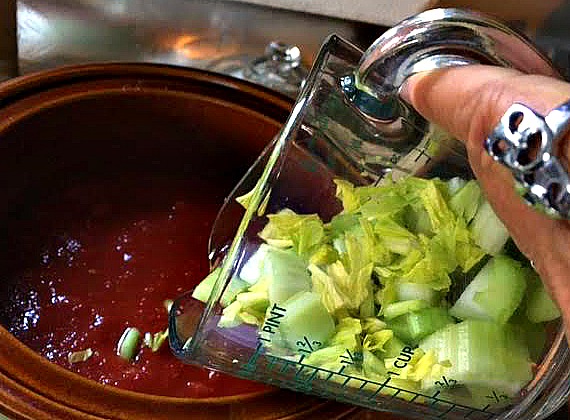
Add a cup of chopped celery hearts (love the leaves).catsup stirring

Stir and cook on high for a few hours while sauce bubbles, then cover and cook on low until reduced by half (~10 hours or overnight).  House will smell divine!

cooked catsup

Sauce has cooked overnight on low (covered) and on high uncovered for a few hours this morning – see how much thicker it’s become?  Let cool to room temperature and taste – I needed to add a touch more sugar and garlic powder.

Vita-mix

I decided against both processor and stick blender since I had a lot of sauce and the Vita-Mix (my blender on steroids) will pulverize so no straining necessary.  If you have a powerful blender, try it and see.

funnel

Funnel into jar and sauce into funnel.

unnamed (6)

Beautiful and extremely tasty – I can understand why people eat catsup sandwiches!  Gonna transfer to a squeeze bottle, but that’s not very photogenic…

Infused Oils – wait, you pay for these???

Rosemary-infused oil collageOne way to get more flavor when cooking is to use infused oils.  I adore rosemary and rub this infused oil on roast chicken, sauté fish and pork in it or just use in vinaigrette.  It’s easy, fast and cheap – the trifecta of cooking.

Rosemary ingredientsYou will need:

Rosemary (or any herb — thyme, basil, sage…)
Oil enough to fill container (we like olive, but use a more neutral oil if you prefer)
Pot, funnel & strainer

rosemary in pot

Pour oil into pot and add your herb of choice.  Bring up to a very, very slow simmer.  The key is to not let the oil get too hot or the herb will fry and then game over.  I bring the heat up slowly and then turn off the flame and allow the oil to cool.  Perform this maneuver a few times and your oil will become more intense with each warming.  Just don’t let it fry!!

oil funnel

When cool (I let the pot sit overnight), use our old friends strainer & funnel and pour into container; I reuse a plastic olive oil bottle though purists might insist on dark glass because I like to see how much I have.  it’s a control thing 🙂

finished oil

And here is the finished product which I keep in the cabinet. Never any spoilage issues, since it’s used within a couple of months.

And if you haven’t fried your rosemary, store in the refrigerator and toss in your next slow-cooked dish – yum!

Simple Syrup – cheap & easy!

simple syrup collageI’m making a ginger syrup today because it’s what we use to sweeten sun tea, but anything or nothing can be used in a simple syrup recipe.  Use it in anything that requires sweetening – beverages (hot or cold), baked goods and booze!

You will need:

whole ginger root
sugar (I use organic turbinado, but I’m just picky!)
water
pot, strainer & funnel

ginger sliced

Roughly slice ginger; it doesn’t have to be even, as long as it’s fresh, not shriveled.

ginger ingredients

For the amount of ginger shown, I put four cups of water and slightly over one cup of sugar.  Since turbinado is a coarse grind, you need to add slightly more to equal a cup of white refined sugar.  It actually isn’t super-critical to measure exactly, so don’t worry!  I use Emeril cookware made by All-Clad and get their quality without the high sticker price.

ginger simmer

Now it simmers over a low flame until concentrated to your taste or you run out of patience.  The more you concentrate, the less you’ll need to add to recipes.  And yes, do taste this periodically to see how sweet it is becoming.  At this point you can turn off the heat and come back later if you’re pressed for time; done it many a time.

ginger funnel

When your syrup has concentrated to your taste, let it cool and transfer to a container using a strainer and funnel, then store in the refrigerator – I’ve left mine there for weeks while out of town.

ginger syrup

Sour milk = queso fresco in minutes

sour milk collage 3If you’re blessed with a family whose milk usage varies from half to 2 gallons a week, depending on their cereal jones, you have faced the same dilemma:  Should it stay or should it go?  Here’s an easy-peasy way to use up the darned stuff that takes less than 30 minutes (most spent simmering on its own).

You’ll need:

sour or milk about to turn – use the sniff test – whole works best
white vinegar (if your milk doesn’t form curds on its own)
dash of salt to taste
stainless steel pot
cheesecloth
colander
candy thermometer

FullSizeRender

Dump milk into pot over medium flame; attach candy thermometer.  When temp hits 180-200° move pot and wait a few minutes to cool.unnamed (4)You are looking for curd separation, so if you don’t see anything after the temperature hits about 150° add a tablespoon of vinegar (more or less, depending on amount of milk) until you get some clumping.  unnamed (5)

This is how the cooled mixture looks when poured into cheesecloth-lined colander. unnamed (6)

I put the colander on top of a pot to collect the whey instead of pouring it down the drain.  While people rave about whey for baking, Chicago in August is not the time to take up a bread-baking hobby. Twist the cheesecloth to squeeze out more whey, but that’s it.  Leave as-is and crumble on tacos.  Press out more liquid for a firmer and drier cheese that will keep longer in the fridge.  Add a tablespoon or two of milk or cream to make creamy cottage cheese.

My gallon yielded roughly 3 cups of very tasty cheese.  While I added a teaspoon of salt, your craving might be different.  I now mourn all those years of wasted milk…

unnamed (7)

Cooking with the Cheapo – hot & humid dining

2c2cb88a-4d09-4b31-a97c-55857f6e14d4

I started with a nice mix of olive oil, a touch of balsamic vinegar, fresh ground pepper, powdered garlic and some Parmigiano Reggiano grated cheese.  Obviously adjust to your personal taste, since we’re big garlic fans over here and you may not be.  Slice a rustic baguette about ¾” on a slight diagonal and paint the mixture on each slice.  Enough to soak into the bread, but not make it too soggy.

9b235b35-f952-4004-905f-12235bdfea89

I’m using a mild Provolone here, but choose another cheese if you have it on hand or there’s a great sale 🙂

ee62a10d-d82b-4e03-afcb-603eb8f1bf6b

Add thinly-cut Prosciutto to each slice, again to your personal preference. When you’re finished…stand back and watch ’em disappear.  This is our second baguette!

79e965aa-bc21-433b-91dc-bb6557d2e06b

.88 Blueberries @ Ultra

Got this Ultra email this morning with this Friday Feature.  Go to the store and none on display and produce knows nothing about this deal but says people keep coming in for their 88¢ blueberries!  Customer Service handled it all very well and rang up my whole produce order, so that was fine.  It’s PITA’s birthday, so we’ll enjoy these with whipped coconut milk either tonight or, more likely, tomorrow afternoon.  Made a big pot of chicken soup with Costco rotisserie chicken and the Ultra carrots and celery plus my 10¢ a box rice from Jewel clearance a few months ago.

unnamedb653deae-c02b-4ead-a31f-af4926c4d5a2

b2667b14-4b7a-4082-bfdb-74edb277b049

reworking old candy – a DIY hot mess

Remember all that cheap chocolate we always find?  And how it always seems like a good deal?  And how it piles up until we get to the point where we’re almost ready to pitch it?  nah, me neither…  ahem.

So I decided that I was gonna make my own Chunky-style candy bars, but I got side-tracked along the way and ended up with something even tastier!

First thing I did was break all these nasty chalky-looking bars into pieces – the flavor isn’t affected (Google it!)
photo.JPGand melted them over indirect heat, the safest way.
photo.JPGInto the pot went milk, vanilla, cinnamon, raisins and dried bits of plums along with a few packages of chopped hazelnuts. I also added a healthy shot of chipotle powder for some kick. Once everything melted I poured the mixture into a plastic-lined pan and put it out on the back porch (covered by a towel) overnight.
photo.JPGNext day I lifted the entire block out of the pan and cut it into small chunks.  At that point it was a lot more like fudge, but then it dried out enough to not leave skid marks when you shove it down your pie hole.  I would recommend keeping it in a ziploc or plastic container to prevent it from drying out too much.  Oh, and I really recommend warning people that the chipotle has a mean kick at the end.

DIY yeast & artisan bread baking

Last year’s bread-baking was such a family hit (2nd bread post; 3rd bread post) that I decided to go one step further and try a DIY yeast! And yes, yeast is cheap and easy to buy, just like you can always go out and buy bread.  Sometimes the pleasure of fresh bread combined with the ability to pronounce the ingredients is enough.

So I did some research and came up with this handy-dandy DIY yeast method!  Since wild yeast grows readily on grapes, decided my first attempt would be with those.
photo 1.JPGStarted with a clamshell of organic red grapes, only because that’s what I had in the house and I prefer to not have pesticide grapes or grown in places where, shall we say, sanitation isn’t a priority. I’ve read that darker reds work faster, but we’re not going anywhere, so use what you have; also read you can use raisins.  I’m using a very large mason jar, which I filled up about1/2 with grapes and tap water.  Some insist on distilled water, but why bother?
photo 2.JPGI added about two scoops of organic, raw sugar to give the yeast something to snack on. The more sugar you add, the faster you see results; not too much, ’cause you’re not making syrup!
photo.JPG
photo.JPGHere’s what the jar looks like after about 3 or 4 days. I put plastic over the mouth before screwing on the lid, to keep it neat and clean inside. Lightly shake a couple of times a day, making sure to first open the top to release the gas that builds up.
photo.JPGAs the grapes ferment, you will get a more and more pronounced wine smell; after a week to ten days (depending on how many grapes, how large a jar, how much sugar) your yeast will be ready to use.

photo.JPGI’m using my basic artisan mixture from last year (replacing warm water and yeast with 3 cups of the grape liquid):  3 cups warm water, 3 Tablespoons coarse salt, 3 Tablespoons yeast and 6 1/2 cups all-purpose flour.  I do use unbleached flour, but I don’t buy into bread flour fancy-pants baking.

photo.JPGAfter mushing the mixture (you do NOT need to knead) so the flour is wet, you put on a lid and ignore it for a couple of days. By the time you decide to stop playing computer games and start baking, it’ll be good to go. Well, that’s what’s always worked for me.  Here the dough has risen almost to the top (it actually rises to the top, but then deflates).  I’ve put a layer of flour on the top, on my hands and on the peel for ease of handling.

photo.JPGHere’s the completed loaf, using the can for size comparison. You let the loaf rest for about 40 minutes, while the oven heats up to about 450º. Here’s where my baking departs slightly from tradition: I bake in cast iron. The steam sets the crust similar to a steam oven in a bakery. If you use my method, put the container in the oven so it’s nice and hot.
photo.JPG
photo.JPGHere’s the same loaf after it’s rested and risen; it will rise more in the oven, so don’t be alarmed.  Liberally dust the top with flour and make shallow indentations with a serrated knife to allow steam to escape.
photo.JPGAfter about 30 minutes, you remove the top from the container and allow the bread to finish baking and brown.  When you first uncover it, the loaf may look pale yellow, which is normal. Bake another 15 or so minutes and then remove. Make sure you place the loaf on a cooling (cookie) rack or it will be mushy on the unvented side.
photo.JPGAnd here’s the finished product. The smell is incredible! Do not cut into this for at least 30 minutes, no matter how great the temptation!  Click on the links in the first paragraph and see my other great bread results.  Baguettes, English muffins and more are all possible (and delicious) with this same dough.

I added more water and sugar to the grape jar and will see how long until I can make another batch of dough.  Since the batch of dough I made is enough for at least three loaves, you could theoretically bake a loaf every other day and use the same yeast starter, rather like a sourdough starter.

And we’ve now sliced and eaten and it’s a plain, delicious loaf of crusty bread, with no wine or sourdough off-tastes.

Cooking with the cheapo: Shamburger Helper with Beyond Meat

Photo.jpg

And it turned out quite nicely, thank you very much.  I’m not  gonna claim it’s a health food, but if you’re looking for quick and easy meat-free comfort – – and the kids will never know (hide the BM pouch at the very bottom of the garbage can).

Photo.jpg

post edit: English muffins for breakfast

If you have been looking for a butter keeper of your own, but were unable to find one under $20+, check out this one on Amazon: Norpro Stoneware Butter KeeperI think it’s the same one as I have since it’s about the same price and holds as much (slightly over one stick). I’m extremely happy with it.

Photo.jpg

FirstBorn had been bugging me to make more English muffins, since they’re so much tastier than store-bought, so I broke down and made a dozen this morning. You know, in my down time…  The egg-shaped object in the background is my butter keeper, so I never have to deal with ripping through toast with hard butter.